

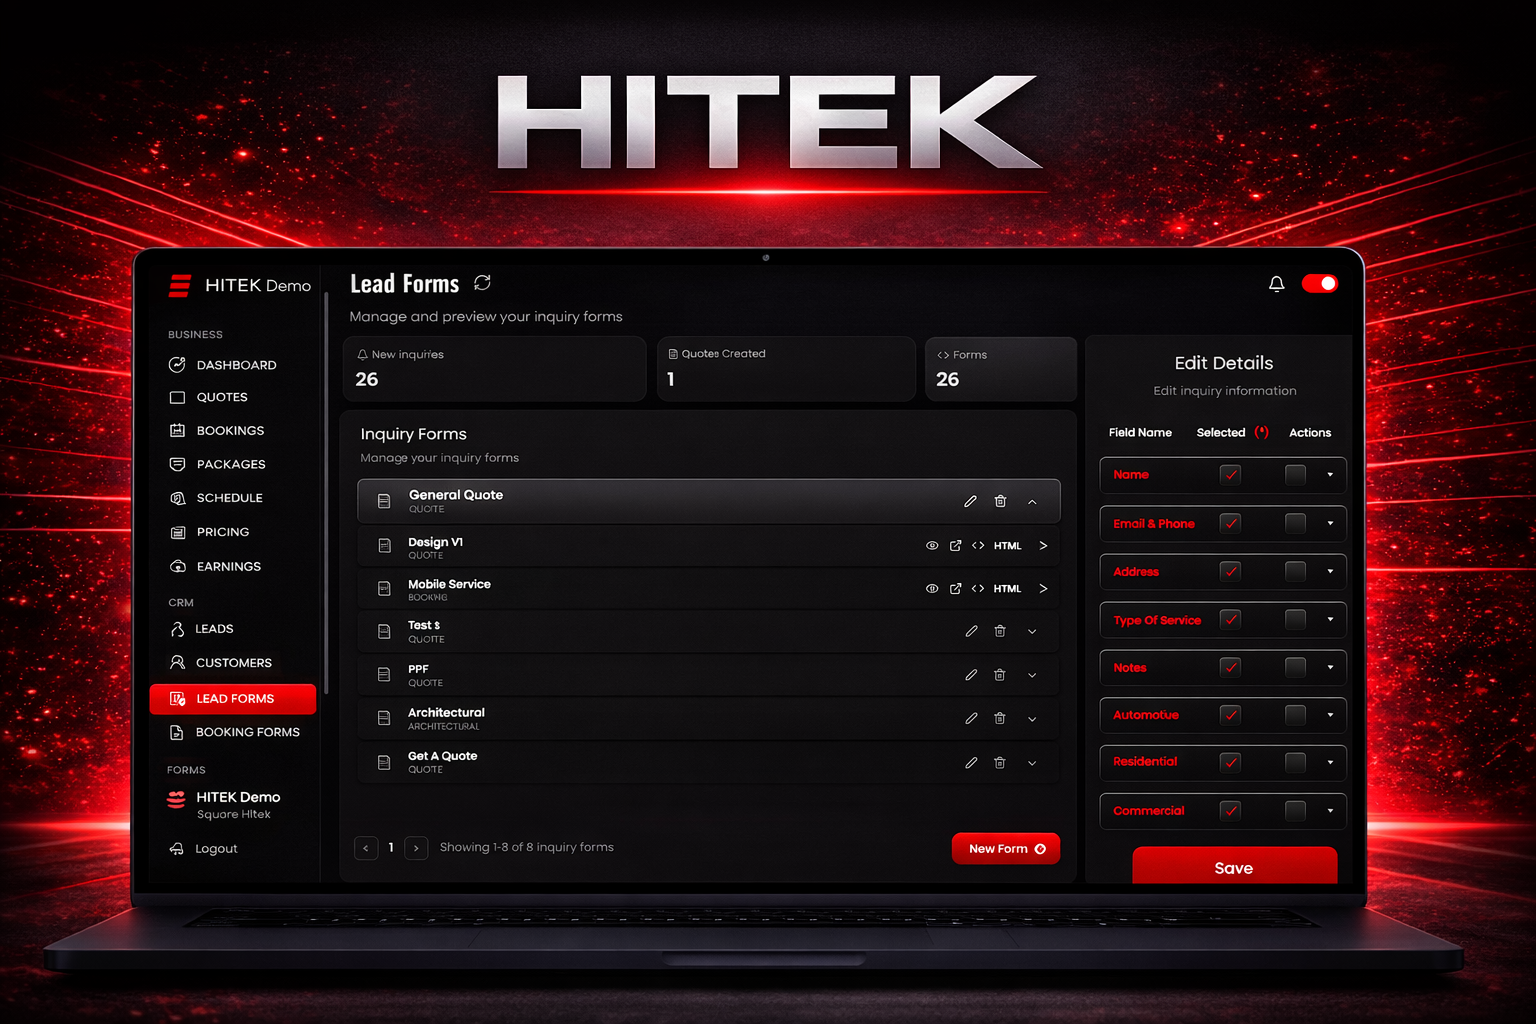
Using the Lead Forms Tab The Lead Forms section controls the inquiry forms used on your website. These forms collect customer information and service requests. Submissions appear in the Leads section of the platform. Proper form setup helps you capture the right details when potential customers contact your business. To begin, log in to the HITEK web portal and open Lead Forms from the left navigation menu. Lead Forms Dashboard The top of the page displays three summary sections. New Inquiries Quotes Created Forms The New Inquiries and Quotes Created sections act as shortcuts. Selecting either option redirects you to the Leads area where incoming inquiries and generated quotes can be reviewed. The Forms section displays the total number of inquiry forms currently created in your system. Inquiry Forms List Below the summary section you will see the Inquiry Forms list. This area contains every form configured for your website. Each form appears as a row in the list and includes several actions on the right side. These actions allow you to edit the form, delete the form, or expand the form to view more details. Selecting a form loads its settings into the editing panel on the right side of the screen. Editing Form Fields The right side panel allows you to update form settings without opening a separate page. This section contains the main fields used in your inquiry forms. These fields include name, address, email and phone, automotive, residential, commercial, and paint protection film. Each field includes two configuration options. Selected determines whether the field appears on the form. Required determines whether the customer must complete the field before submitting the form. Many fields contain additional sub fields. Expanding a field reveals the individual items that can be enabled or required. For example, the name field includes first name and last name. The address section includes address, city, state, and zip code. The email and phone section includes separate fields for email and phone. Service categories such as commercial or paint protection film may include additional options such as film series, film type, budget, or notes depending on how the form is configured. After making changes in the editing panel, save the form to apply the updates. Creating a New Form To create a new inquiry form, select New Form at the bottom of the page. This opens the form creation window. Enter a name for the form. Then choose which fields should appear on the form and which fields should be required. You can expand each field to configure its sub fields and control what information the form collects. After setup is complete, create the form. The new form appears in the Inquiry Forms list where it can be selected and edited from the side panel. Using the Lead Forms tab allows you to control how customer inquiries are collected and ensures information submitted through your website flows directly into the HITEK lead management system.
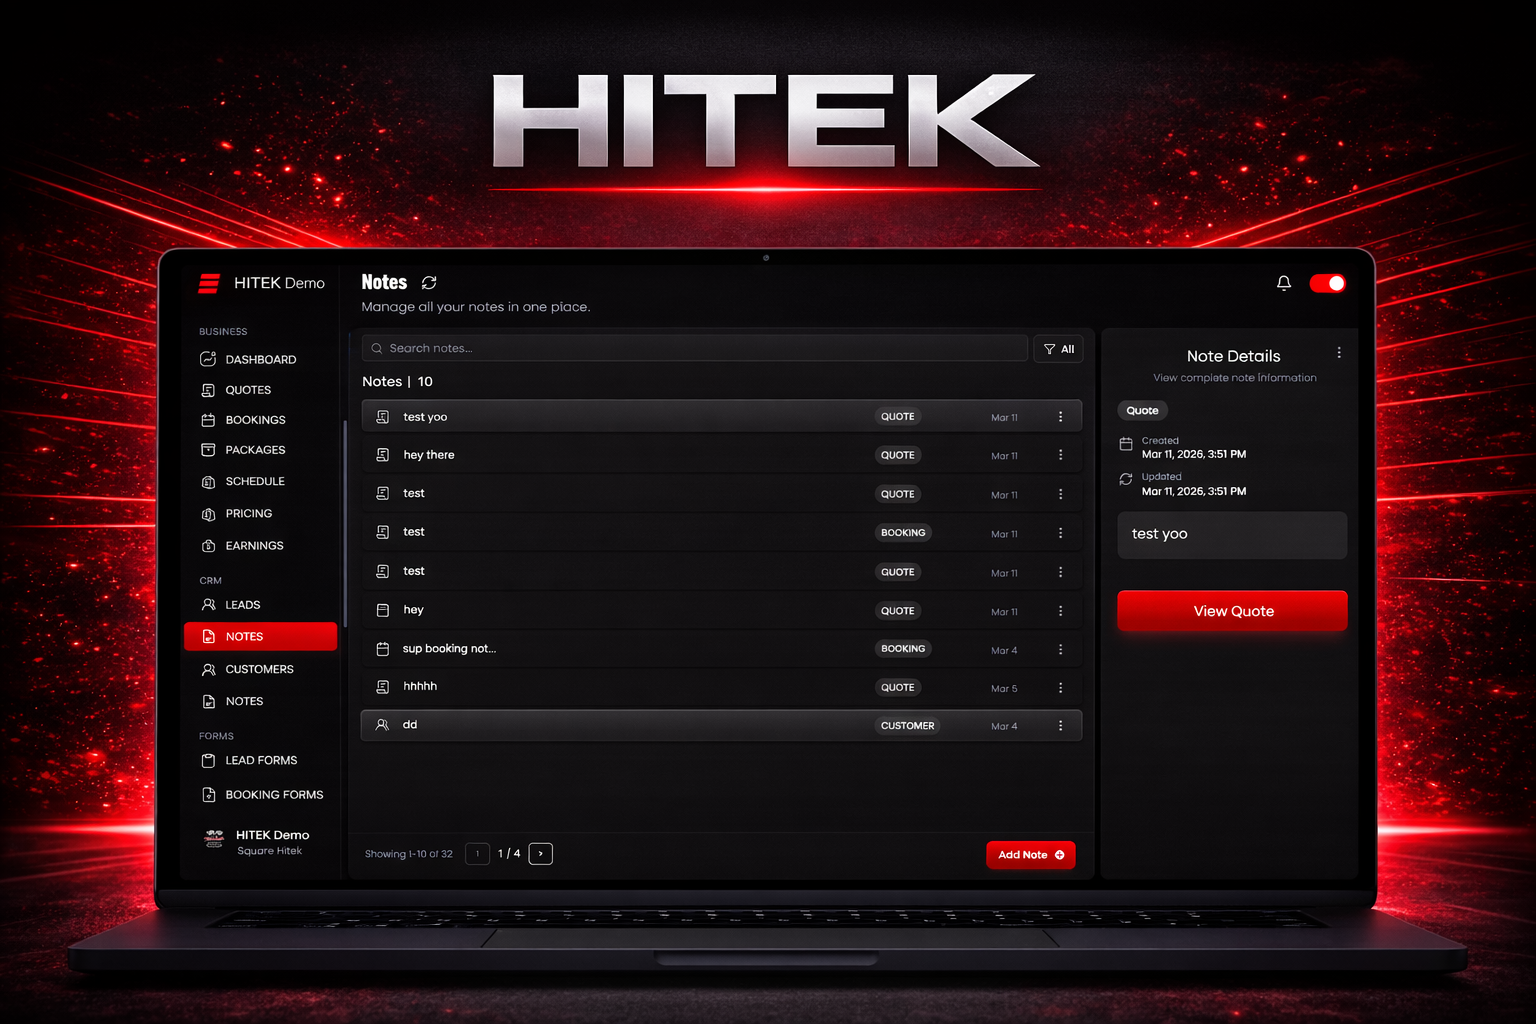
Using the Notes Tab The Notes tab allows you to create and manage internal notes inside the HITEK platform. These notes help your team record important details related to quotes, bookings, or customers. Notes keep internal information organized without sending it to customers. To access this section, log in to the HITEK web portal and open the Notes tab from the left navigation menu. Notes Overview The Notes page displays a list of all saved notes. Each entry includes the note title and a tag that shows the type of note. These tags identify what the note is connected to, such as a quote, booking, or customer record. Selecting a note from the list opens the full note in the details panel on the right side of the screen. This panel shows the complete content of the selected note so it can be reviewed quickly. Filtering Notes A filter tool appears at the top of the notes list. This tool allows you to narrow results based on the type of note you want to view. Available filters include all notes, quote related notes, booking related notes, and customer related notes. Using filters helps you find specific notes faster as the list grows. Creating a Note To add a new note, select Add Note in the bottom corner of the page. A note creation window opens where you can define the note type and enter the note content. Choose the appropriate note category and type the information you want to record in the text field. After the note is complete, save it to add it to the notes list. If you decide not to create the note, you can cancel the process. After saving, the new note appears in the notes list and can be selected for review at any time. Editing or Deleting Notes You can manage existing notes directly from the notes list. Select the options menu next to a note to open actions for editing or deleting the note. Editing allows you to update the content while keeping the note in the system. Deleting removes the note completely from the list. Using the Notes tab consistently helps your team track internal information and maintain clear records across customers, quotes, and bookings within the HITEK platform.
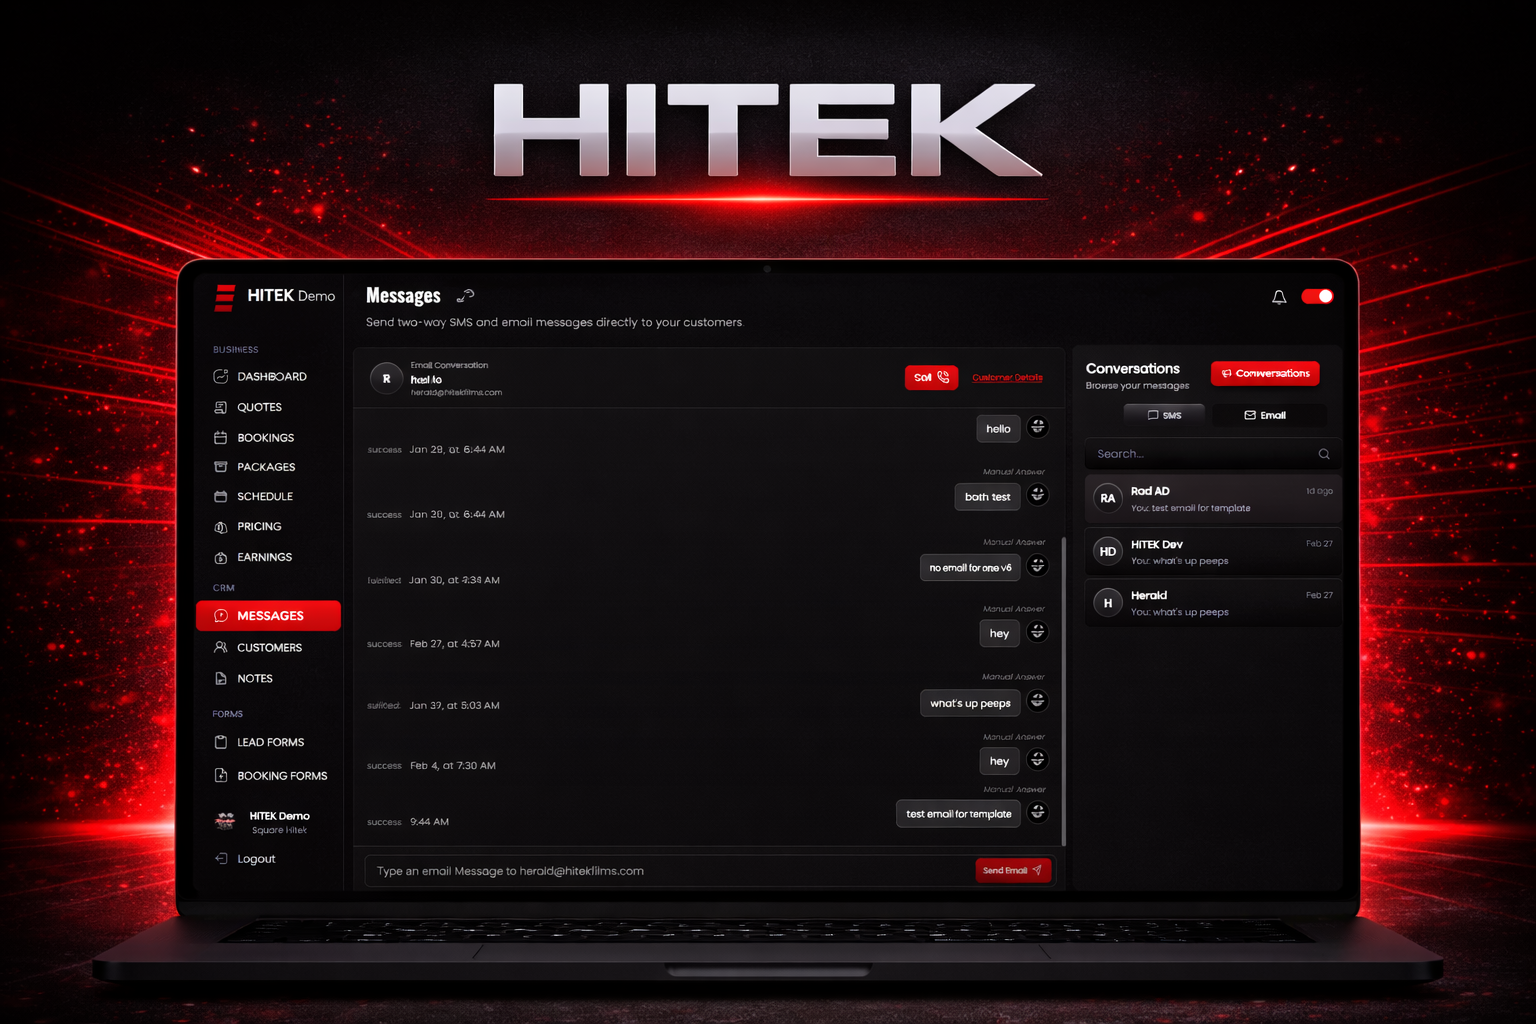
Using the Messages Tab The Messages tab allows you to communicate with customers directly from the HITEK platform. This feature supports both SMS and email conversations, which makes it easier to respond to customers, answer questions, and keep communication organized in one place. To begin, log in to the HITEK web portal and open the Messages section from the left navigation menu. Messages Layout The Messages page uses a conversation style layout. The center area displays the active conversation you are currently viewing. If no conversations exist, the system will display a message showing that no conversations are available. On the right side of the screen you will see the conversations panel. This panel contains tools for navigating conversations, switching communication types, and starting new messages. Conversation Controls The conversations panel allows you to switch between SMS and email conversations. Selecting SMS shows all text message conversations. Selecting Email displays email threads. A search bar is also available in this panel. You can search by customer name to quickly locate an existing conversation. Starting a New Conversation To start messaging a customer, select New Conversation. A window will open where you can search for a customer using their name, email address, or phone number. After selecting the customer, the chat window opens and you can begin the conversation. Messaging Customers The chat window displays the conversation history between you and the selected customer. At the top of the screen you will see the customer’s name along with their contact information. On the side of the chat window you will find quick actions that allow you to call the customer or view their profile information. To send a message, type your text in the message field at the bottom of the chat window. When using email mode, the message is sent as an email. When using SMS mode, the message is delivered as a text message. Customer Details Access If you need to view more information about the customer during a conversation, select the customer details option. This opens the customer’s profile in the Customers section where you can review contact information, job history, and account details. Using the Messages tab keeps customer communication inside the HITEK platform so your team can manage conversations without switching between separate messaging tools.

Using the Customers Page The Customers page in the HITEK platform allows you to manage customer records, review job history, and quickly start new quotes or bookings. This section acts as a central location for tracking customer activity and maintaining contact information. To access this page, log in to the HITEK web portal and open the Customers section under the CRM menu on the left side. Customer Overview The Customers dashboard displays a list of every customer stored in your system. At the top of the page you will see the total number of customers currently saved. A search bar allows you to locate a customer quickly using their name, email address, or phone number. This becomes more useful as your customer list grows. Below the search bar you will see the customer list. Each entry displays the customer’s name, email, and the date their profile was created. Selecting a customer opens their details in a panel on the right side of the screen. Adding a Customer If you need to create a new customer manually, select Add Customer in the top right corner of the page. A form will appear where you can enter the customer’s information. This includes first name, last name, email address, phone number, street address, city, state, and zip code. After entering the information, save the record to add the customer to your system. Customer Quick View Selecting a customer from the list opens a quick view panel that summarizes their information and activity. This panel displays the customer’s contact details along with key statistics such as total jobs, total spending, and average job value. You will also see a list of recent jobs associated with that customer. Opening the Customer Dashboard From the quick view panel you can open the full customer dashboard. This page provides a more detailed overview of the customer’s relationship with your shop. The dashboard displays key metrics including the total number of jobs completed, total spending, average job value, and the date the customer was first added to your system. Below these details you will find action buttons that allow you to start a new quote, create a booking, contact the customer, or view notes related to the account. Viewing Job History The customer dashboard also includes a list of all jobs associated with that customer. Selecting any job from this list opens the full job record where you can review the quote details and service information. Customer information and job history remain visible in the side panel while you review the job. Creating a New Job If a customer needs additional work scheduled, you can start a new job directly from their dashboard. Selecting the option to add a job opens a window where you can choose to create a quote or create a booking. This allows you to begin a new service request without reentering customer information. Using the Customers page effectively helps keep your customer database organized while giving you quick access to job history and communication tools. This makes it easier to manage repeat customers and maintain accurate records inside the HITEK system.
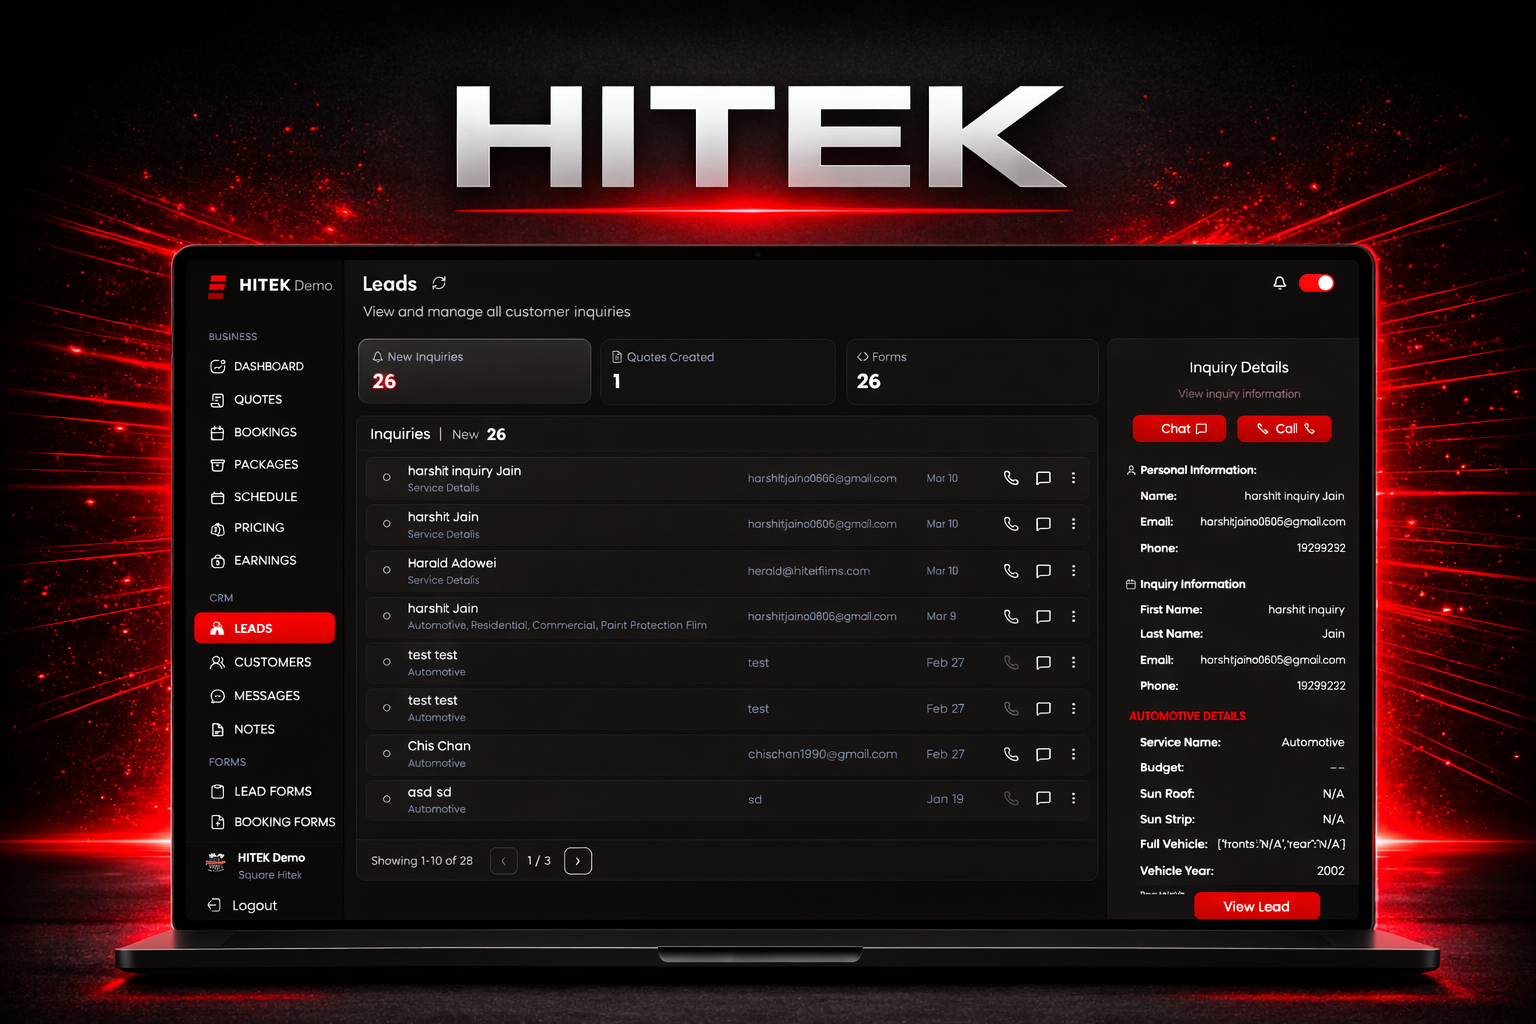
Using the Leads Page The Leads page helps you manage incoming customer inquiries and track quotes created from those inquiries. This section is part of the CRM area in the HITEK platform and gives you a clear view of potential customers who have contacted your shop. To access this page, log in to the HITEK web portal and open the Leads section from the CRM menu on the left side of the screen. Leads Overview The Leads page is organized into three sections that help you track inquiries and related activity. New Inquiries Quotes Created Forms Each tab displays a different type of lead information. New Inquiries The New Inquiries tab displays submissions received from customers through your website forms. When a customer completes an inquiry form, their information automatically appears in this list. These submissions typically include the customer’s contact details and their service request. Reviewing this section regularly helps you respond quickly to potential customers. If no inquiries have been submitted, the page will display a message showing that no inquiries are available. Quotes Created The Quotes Created tab lists quotes that have already been generated in the system. This section gives you a quick way to review quotes that originated from customer inquiries. Each entry represents an existing quote and lets you see what has already been created for a potential job. Forms The Forms tab shows the number of inquiry forms currently configured for your website. Customers use these forms to submit service requests. Selecting this tab redirects you to the Lead Forms page, where you can view or manage the forms connected to your website. Using the Leads Page Effectively Checking the Leads page regularly helps ensure customer inquiries do not get missed. By reviewing new submissions, tracking created quotes, and keeping your lead forms up to date, you can keep your sales pipeline organized and respond faster to potential customers. The Leads page gives your team a simple way to stay on top of customer interest and move inquiries through the quoting process more efficiently.
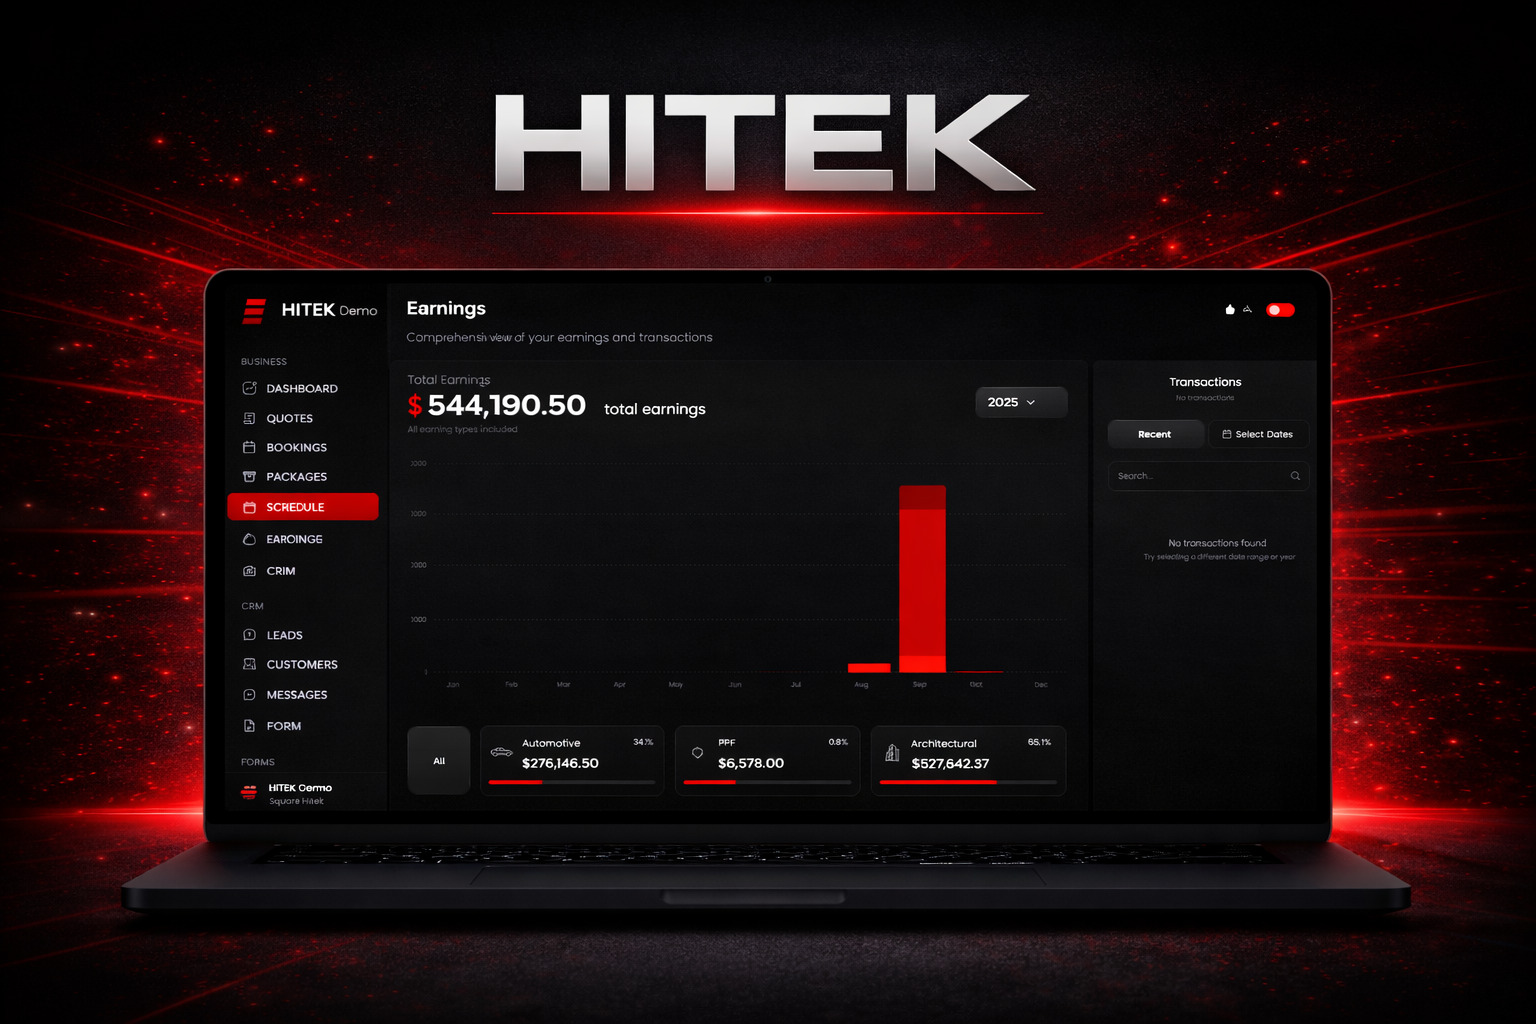
Using the Earnings Page The Earnings page in the HITEK platform allows you to track revenue and review transaction activity. This section provides a clear view of how much income has been recorded during a selected time period and allows you to search and filter payment history. Start by logging into the HITEK web portal and opening the Earnings section from the left navigation menu. This will bring you to the Earnings dashboard. Revenue Overview At the top of the page you will see the Total Earnings figure. This number represents the total amount of recorded revenue within the selected date range. Adjusting the date range will update this value to reflect the earnings for that specific period. Transaction Activity The transactions panel displays a list of recorded payments and completed transactions. This section allows you to quickly review financial activity and identify recent payments. You can filter or search transactions directly from this panel. Viewing Recent Transactions Selecting the Recent Transactions option displays the most recently recorded payments. This view is useful for quickly checking the latest activity in your system. Filtering by Date Range If you need to review earnings for a specific time period, use the date selection tool. Opening the date filter allows you to choose from preset ranges or create a custom range. Common preset options include: Last 7 Days Last 30 Days Last 90 Days These presets make it easy to quickly review short term or monthly revenue. For more precise reporting, a custom date range can be selected using the calendar view. Navigate between months using the arrows, then choose the start date and end date for the period you want to analyze. Once the desired range is selected, apply the filter to update the results. If you decide not to change the range, you can discard the selection instead. Searching Transactions The search function allows you to locate specific transactions quickly. You can search using a customer name or a booking reference to find the related payment record. If no transactions appear after searching, check the selected date range to make sure the filter includes the time period when the transaction occurred. Reviewing earnings regularly helps you monitor revenue flow and confirm that payments are being recorded correctly inside the HITEK system.
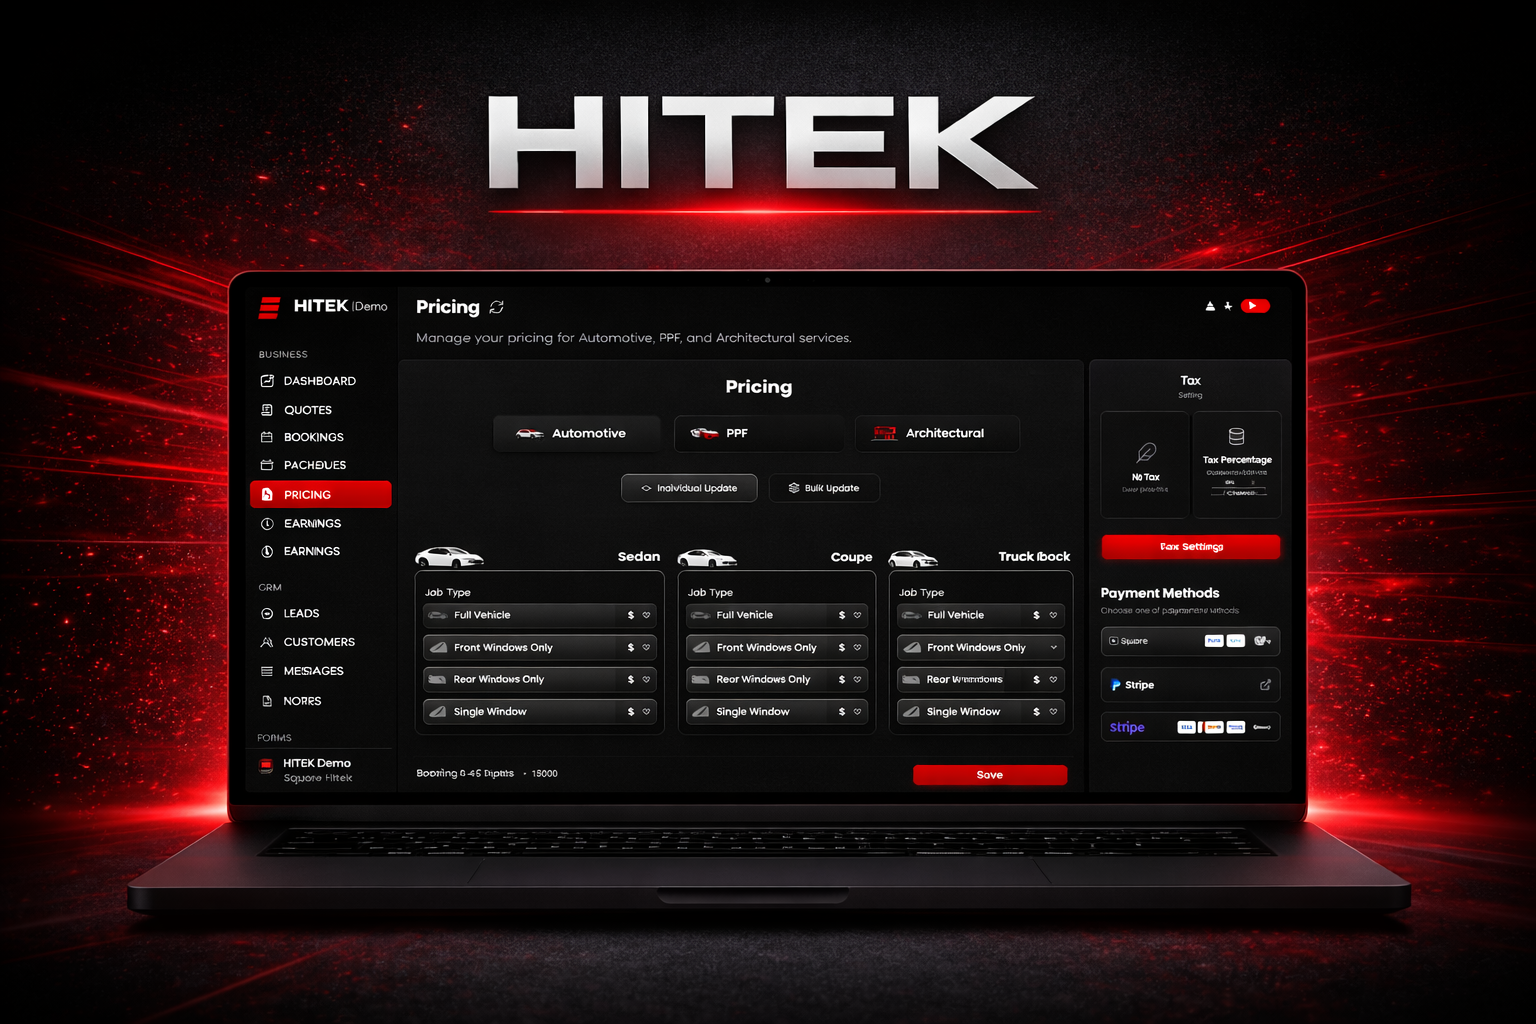
Setting Up PPF Pricing The Pricing section in the HITEK dashboard controls how the system calculates costs for paint protection film jobs. Once pricing is configured, the platform automatically applies those values when creating quotes and bookings. Setting this up correctly ensures consistent pricing across every job. Begin by logging into the HITEK website dashboard and opening the Pricing section from the left navigation menu. At the top of the page, select PPF as the pricing type. Two update methods are available for managing pricing. You can update values one vehicle at a time or apply changes across multiple vehicles and packages at once. Individual Pricing Updates Individual updates allow you to adjust pricing for specific vehicle categories and package options. This method is useful when only a few values need to be modified. Each vehicle category appears as its own pricing card. Common categories include sedan, coupe, small SUV, large SUV, four door truck, two door truck, wagon, hatchback, and other. Within each vehicle type you will see the available PPF coverage packages. These typically include front bumper package, partial front package, full front clip package, and entire vehicle package. Each package can be priced according to the film type being installed. Film options may include PPF Ultra, PPF Ultra Matte, Black PPF, and White PPF. To update pricing, select the appropriate package and film option, then enter the desired price. Once all adjustments are complete, save the changes so the system can apply the new pricing values. Bulk Pricing Updates Bulk updates allow you to adjust multiple prices across vehicle types, packages, or film options in a single action. This is the fastest way to update pricing when changes apply across many configurations. Start by selecting Bulk Update near the top of the pricing page. The system will guide you through several selections. First choose the vehicle categories you want to update. Multiple vehicle types can be selected at the same time. Next select the coverage package you want to modify. Options may include front bumper, partial front, full front clip, or entire vehicle protection. After that, choose the film types that should receive the pricing update. Multiple film options can be selected if needed. Finally enter the new price and apply the change. The system will assign that value to every combination selected during the update. After performing a bulk update, remember to save the changes to finalize the pricing configuration. Tax and Payment Settings The Pricing page also includes additional configuration settings. On the right side of the screen you can set your tax percentage and connect payment options such as Square, PayPal, or Stripe. These settings control how payments are processed and how taxes are applied to customer transactions. Once pricing and payment settings are saved, the HITEK system will automatically use those values whenever PPF quotes or bookings are created. This helps ensure that pricing remains accurate and consistent across every job. Automotive Pricing Updates Automotive tint pricing is managed in the same Pricing section of the dashboard. Instead of selecting PPF , choose Automotive as the pricing type. The system allows pricing to be configured based on vehicle category and service coverage. Coverage options typically include full vehicle, front windows only, rear windows only, and single window services. Each job type can be paired with different film packages such as standard film, classic film, hybrid film, carbon IR, ceramic IR, ceramic pro, ceramic plus, and ceramic ultra. Prices can be adjusted individually for each vehicle category or updated across multiple configurations using the bulk update tool. Individual updates allow precise control for specific vehicles, while bulk updates make it easier to adjust pricing across the entire system. After updating values, save the changes to ensure the pricing is applied to all future quotes and bookings created within the HITEK platform.
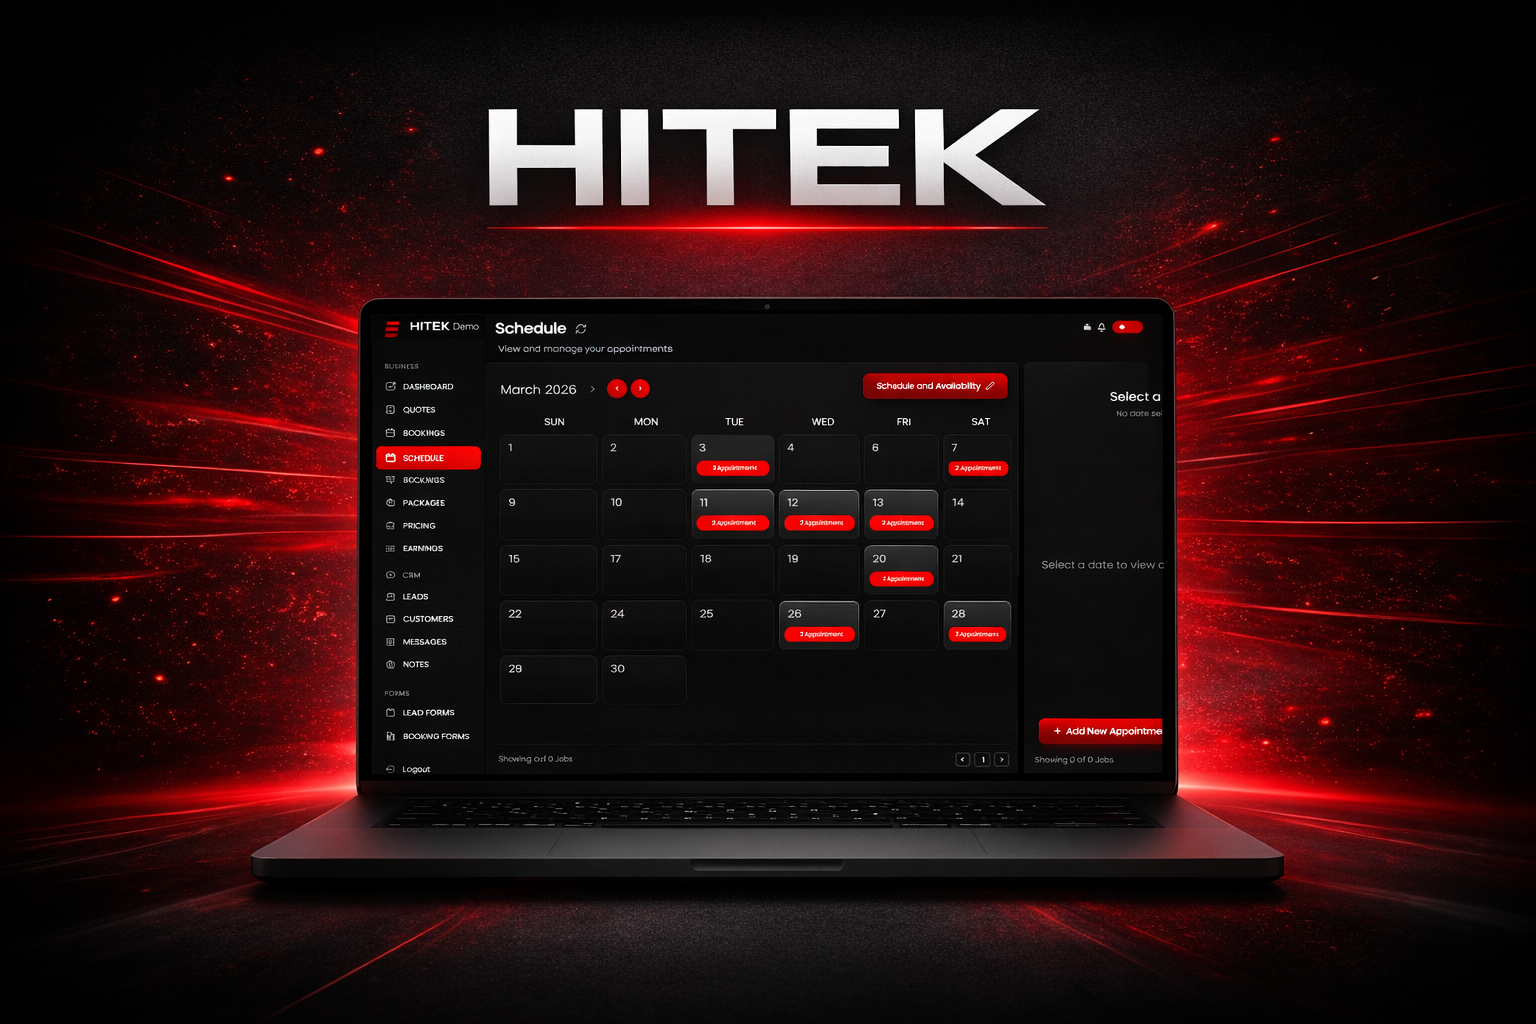
Using the Schedule Page The Schedule page helps you manage appointments and control your shop’s availability. It provides a clear view of upcoming bookings and allows you to define when your business is open for scheduling. To begin, log into the HITEK web portal and open the Schedule section from the left navigation menu. Calendar Overview The Schedule page opens in a monthly calendar view. At the top of the calendar you will see the current month and year. Navigation arrows allow you to move forward or backward through different months. Each square on the calendar represents a day. Selecting a date displays the appointments scheduled for that day. On the right side of the screen you will see a panel that shows the selected date along with any appointments assigned to that day. This panel also includes an option to add a new appointment. Creating an Appointment If you need to schedule a job from the calendar, select Add New Appointment. This action redirects you to the booking process where the full job details are entered. The Schedule page itself is used to view appointments and manage availability. Actual bookings are created through the booking workflow. Managing Shop Availability In the top right area of the page you will find the Schedule and Availability option. Selecting this opens the scheduling settings for your shop. This section allows you to define your weekly operating schedule and block out times when appointments cannot be booked. Weekly Schedule The weekly schedule lists each day of the week. Monday Tuesday Wednesday Thursday Friday Saturday Sunday Select the days your shop is open. For each active day, set the start and end times that represent your working hours. If a day is not selected, the system treats that day as unavailable for bookings. Unavailability Settings The Unavailability section allows you to block specific dates or time ranges when your shop cannot accept appointments. This can be used for holidays, training days, private events, shop closures, or partial day closures. Once an unavailability slot is created, the system prevents appointments from being scheduled during those times. Multiple Bookings Per Hour Another setting allows multiple bookings within the same time slot. Enabling this option allows overlapping jobs to appear on the schedule. Only use this setting if your shop has the staff or space to handle multiple installations at the same time. Saving Your Schedule After configuring your weekly hours and any unavailable dates, save the changes to apply them to your calendar. If you decide not to apply the changes, you can discard them instead. Keeping Your Schedule Accurate The Schedule page controls when appointments are allowed, but it does not create bookings on its own. All new appointments must still be created through the booking workflow. Because of this, it is important to keep your availability settings accurate. Always confirm that your working days, operating hours, and blocked time slots reflect your actual schedule. Maintaining these settings ensures customers and staff only book appointments during the times your shop is available.
Creating Bookings in HITEK The booking system in HITEK helps you schedule jobs, organize customer information, and confirm services in one place. Whether you are scheduling architectural film, paint protection film, or automotive tint, the process follows the same structure. You start by selecting the job type, entering customer details, building the job, and confirming payment. Begin by logging into the HITEK web portal. From the left navigation menu, open the Bookings section. This page displays upcoming, ongoing, completed, and cancelled jobs. To schedule a new job, click Create Booking in the bottom right corner. Architectural Bookings Architectural bookings focus on window measurements and film selection rather than vehicle details. After selecting Architectural as the job type, enter the customer’s contact information and the full property address where the installation will take place. Then schedule the appointment by entering the date and time. Some shops also use this section to track delivery or staging times for materials. Once the appointment details are complete, move to the job builder. Here you choose the film that will be installed. Architectural films are organized by purpose. Security options include films such as Security Clear, Anti Graffiti, and Security Dyed. Solar control films include Ceramic DR, Ceramic Clear, Hybrid DR, Silver Reflective, Neutral View, Exterior Silver Reflective, and Bronze. Privacy films include Black Out, White Out, and Frost. After selecting the film type, begin adding windows to the project. Each entry requires the window height, width, and the quantity of identical windows. As windows are added, the system calculates the total square footage and updates the job summary automatically. If the project includes multiple window sizes, simply add another entry for each size. A notes section allows you to record installation details such as ladder access, second floor work, or special customer requests. The system automatically applies the price per square foot based on your preset pricing configuration, tho ugh it can be adjusted if necessary. Photos of the property or glass layout can also be uploaded for documentation. Before completing the booking, review the window count, film type, square footage, and total cost. Once everything looks correct, select the payment structure and send the booking to the customer. PPF Bookings Paint protection film bookings require vehicle information along with the protection package being installed. After selecting PPF as the job type, enter the customer’s contact information and appointment schedule. The next step is capturing the vehicle details. Select the correct vehicle category since vehicle size affects pricing. Then enter or scan the VIN and confirm the make, model, and year. Once the vehicle is confirmed, you can build the protection package. Many shops begin by selecting a package such as a front bumper package, partial front package, full front clip package, or full vehicle package. The system displays the areas covered within each package. Additional protection zones can be added if the customer wants extra coverage. Common add-ons include luggage areas, pillar roof sections, door edges, headlights, or rocker panels. Each additional zone automatically updates the price. Next, choose the film type being installed. Options may include PPF Ultra, PPF Ultra Matte, Black PPF, or White PPF depending on your configuration. Additional services can be added through the extras section. These might include tint removal, ceramic coating, or other services performed during installation. Custom extras can also be added if the service is not already listed. Photos of the vehicle can be uploaded to document its condition before installation. If necessary, the total price can also be adjusted manually using the custom price field. After reviewing the package, film type, additional zones, and total cost, select the payment structure and send the booking. Automotive Tint Bookings Automotive bookings focus on vehicle information, window coverage, and film selection. After selecting Automotive as the job type, enter the customer’s contact information and schedule the appointment. The next step captures the vehicle details. Select the vehicle category, then enter or scan the VIN. Confirm the make, model, and year before continuing. The job builder allows you to define the coverage for the tint installation. This may include full vehicle coverage, front windows only, rear windows only, or individual windows depending on the job. Shade selections can then be applied for the front windows and rear windows. If a section does not apply, it can simply be marked as not applicable. Additional services can be added through the add ons section. These often include sun strips, windshield tint, rear windshield tint, or sunroof coverage. Pricing updates automatically as services are selected. Next, select the tint package being installed. Film options may include standard film, carbon IR, ceramic IR, ceramic plus, hybrid, ceramic pro, or ceramic ultra depending on your shop’s configuration. Extras such as tint removal or other services can also be included. Photos can be uploaded if you want to document the vehicle before installation. Before finalizing the booking, review the job summary on the right side of the screen to confirm the customer information, appointment details, vehicle information, selected services, and total price. Once everything is verified, choose the payment structure and send the booking to the customer. Managing Bookings Efficiently Using the booking system inside HITEK keeps appointments, services, and pricing organized in a single workflow. Every job type follows the same general structure, which helps reduce mistakes and keeps scheduling consistent across your shop. By building bookings directly inside the platform, shops can track jobs, manage communication, and maintain accurate records from the first appointment through project completion.
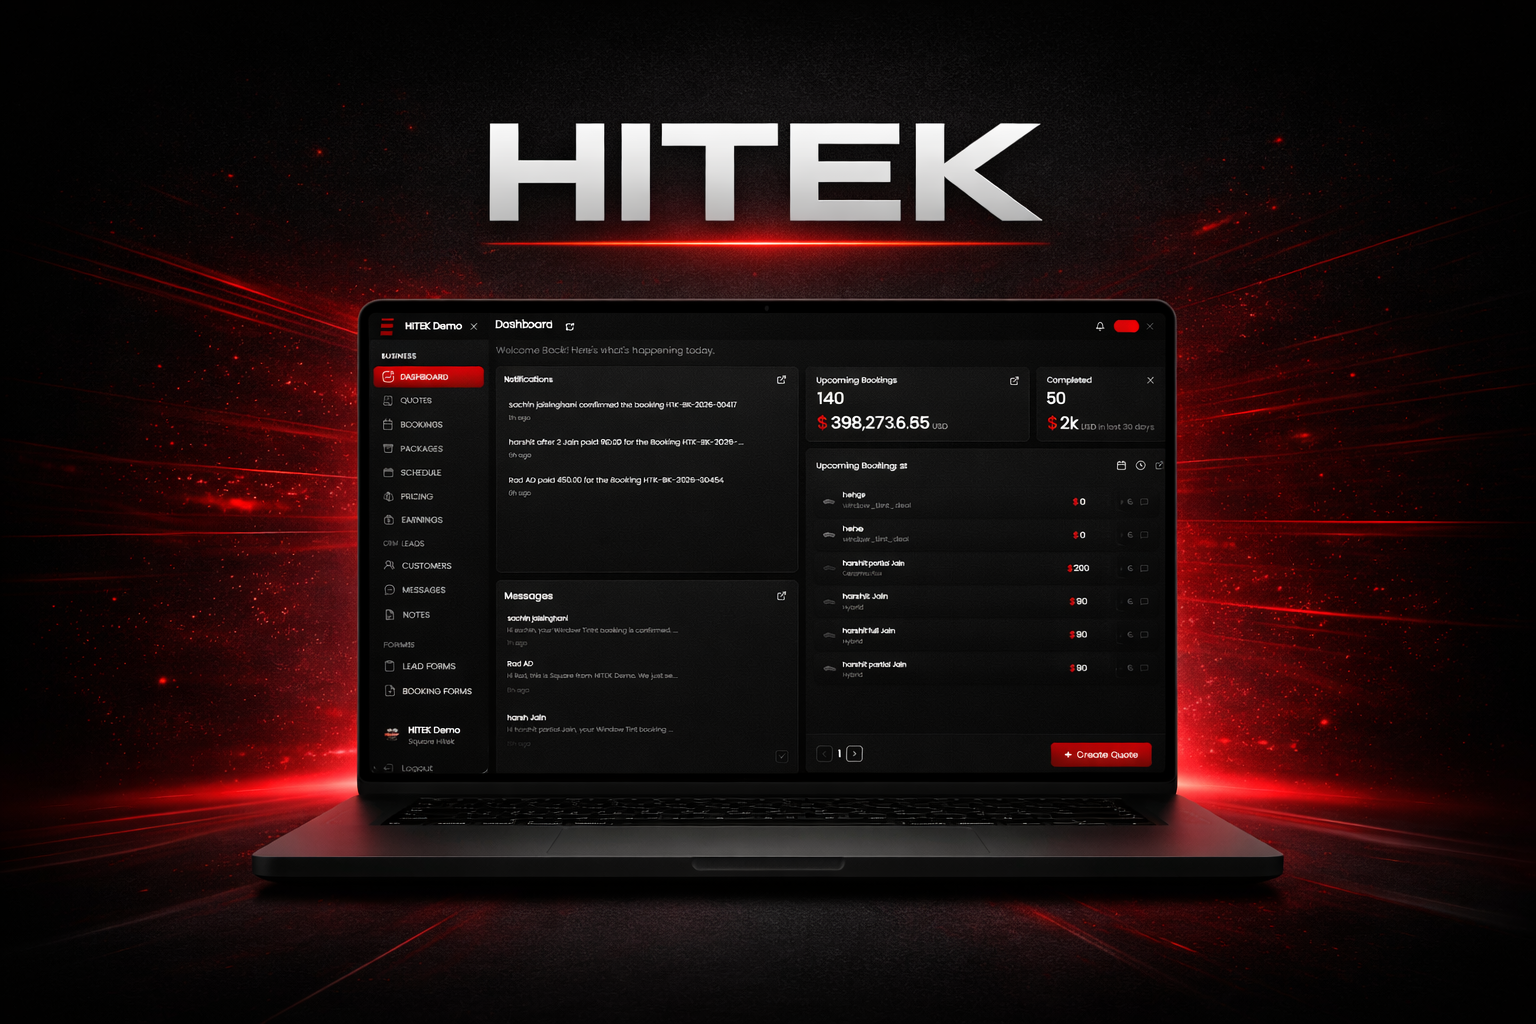
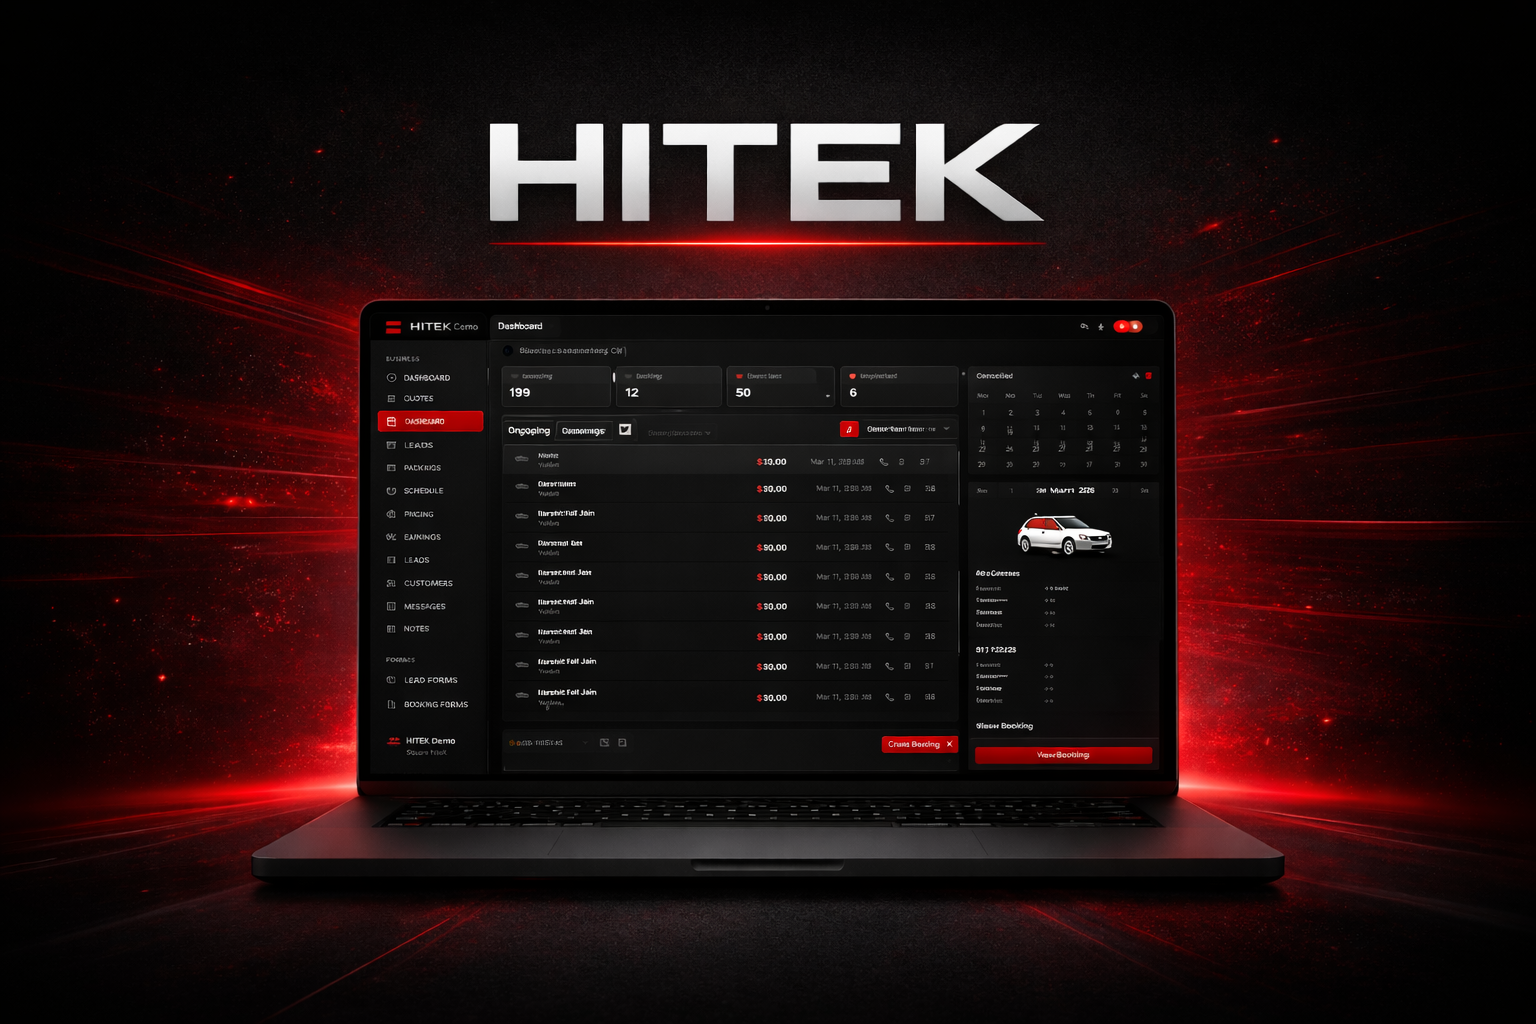
HITEK Dashboard Overview The HITEK dashboard is the control center for your business. It gives you a clear view of revenue, bookings, customer activity, and communication in one place. Instead of switching between tools, you can monitor what is happening inside your shop from a single screen. When you log into the web version of HITEK, the dashboard is the first page you see. It is built to help you quickly understand the health of your business and take action when needed. Top Section At the top of the dashboard you will see the page title and a refresh icon. The refresh icon allows you to manually update the data so you can confirm you are viewing the most recent information. On the top right corner you will see a notification bell. This alerts you when bookings are confirmed or payments are received. These alerts help you stay aware of activity without constantly checking different parts of the system. Checking notifications each day helps you stay informed about what is happening in your business. Left Side Navigation The left side menu allows you to move through the entire HITEK system. It serves as the main navigation for managing your operations. Under Business you will find the core tools that control your workflow: Dashboard Quotes Bookings Packages Schedule Pricing Earnings These sections help you manage services, pricing, and daily operations. Under CRM you will find the tools that manage customer relationships: Leads Customers Messages Notes This section helps you track prospects, maintain communication, and organize customer information. Under Forms you can manage the forms used to collect information from customers: Lead Forms Booking Forms These forms capture new leads and allow customers to request appointments. Under Account you will find settings that control your company profile and team access: Team Manage Account About Support At the bottom of the navigation menu you will see your company name along with the logout option. All of these sections work together to organize every part of the HITEK platform. The dashboard sits at the center of the entire system. Notifications Panel The first section on the main dashboard screen is the Notifications panel. This panel shows important activity such as booking confirmations, payments received, and customer interactions. Each entry includes the booking ID and how long ago the event occurred. The goal is quick visibility. Instead of opening individual bookings to see what changed, you can scan this panel and immediately understand what is happening in your system. Messages Panel Below the notifications panel you will find Messages. This section displays recent conversations with customers. You will see the customer name along with a preview of their message. If you manage multiple leads or ongoing installations, this section helps keep communication organized. You can quickly identify which customers need a response and stay on top of conversations. Performance Summary Cards On the right side of the dashboard you will see performance summary cards. These cards provide a quick snapshot of your business activity. Upcoming Bookings This card shows the total number of scheduled jobs along with the projected revenue connected to those bookings. Completed This card shows how many jobs were completed and how much revenue was generated in the past 30 days. These numbers give you a quick view of your pipeline and recent production. Upcoming Bookings List Below the summary cards you will see the detailed Upcoming Bookings section. Each booking entry includes the customer name, service type, price, and the scheduled date and time. You will also see quick action icons that allow you to view booking details or contact the customer directly. If you need to schedule a job manually, you can click Create Booking in the bottom right corner of this section. Why the Dashboard Matters The HITEK dashboard is where daily business management starts. You can track revenue trends, monitor booking activity, and stay on top of customer communication. It also helps you spot slow periods in your schedule before they become a problem. Many shop owners start their day here because it provides a clear picture of what needs attention. Checking the dashboard regularly helps you stay organized and run your business more efficiently.